
<article> Stained garage floors are more than an eyesore – they’re a challenge to clean and maintain, especially in Austin’s tough climate. The combination of unsealed concrete, vehicle leaks, and Texas weather creates the perfect storm for oil stains, rust, and moisture damage. Here’s how to tackle these issues effectively:
- Identify the stains: Common culprits include oil, rust, tire marks, paint spills, and moisture discoloration.
- Clean thoroughly: Use tailored methods like degreasers for oil, vinegar for rust, and TSP for paint. Pressure washing can help but must be done carefully.
- Repair damage: Fill cracks and grind surfaces to prepare for coatings. Use primers to block deep stains and moisture.
- Apply durable coatings: Epoxy and polyaspartic systems provide a strong, long-lasting barrier against stains and wear.
Key takeaway: Professional-grade coatings, combined with proper cleaning and repair, transform stained, porous concrete into a durable, easy-to-maintain surface. Epoxy Flooring Group specializes in these solutions, offering quick installations and lifetime warranties to handle Austin’s challenging conditions.
</article>
How to Clean Four Common Concrete Stains
How to Identify Different Types of Garage Floor Stains
Garage Floor Stain Types Identification Guide
Common Stain Types and What Causes Them
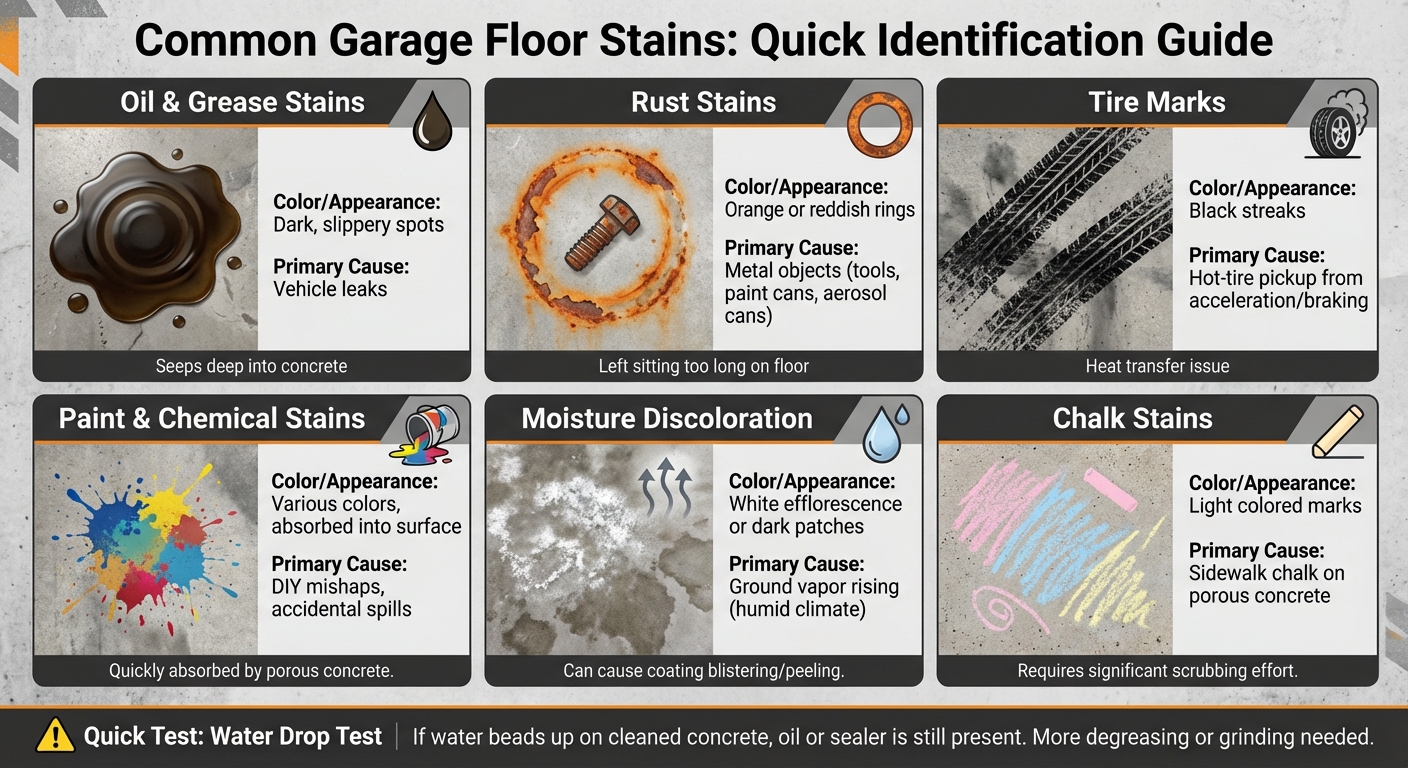
Recognizing the type of stain on your garage floor is the first step to figuring out how to clean it effectively. Oil and grease stains are some of the most frequent offenders in Austin garages. These dark, slippery spots often come from vehicle leaks and pose both safety risks and long-term issues. If left untreated, they can seep deep into the concrete, making it tough for new coatings to adhere properly.
Rust stains are another common issue. They typically appear as orange or reddish rings, often caused by metal objects like tools, paint cans, or aerosol cans that have been left sitting on the floor for too long. Then there are tire marks – those black streaks you see from hot tires transferring heat during acceleration or braking. This problem, known as hot-tire pickup, is especially tricky to remove.
Paint and chemical stains often result from DIY mishaps or accidental spills. Because concrete is porous, it quickly absorbs these liquids, making them harder to clean. Meanwhile, Austin’s humid climate introduces a unique challenge: moisture discoloration. This happens when ground vapor rises, leaving behind musty odors, white efflorescence, or even dark patches on the floor. Over time, this moisture can push up with enough force to cause floor coatings to blister or peel. Even something as seemingly harmless as sidewalk chalk can leave behind stubborn stains on porous concrete, requiring significant effort to scrub away.
Once you’ve identified the type of stain, the next step is to assess its severity and decide on the best cleaning approach.
Quick Tests to Check Stain Severity
Before diving into cleaning or applying a new coating, it’s smart to test the stain’s severity. Start with the water drop test: sprinkle a few drops of water on the cleaned area. If the water beads up, it means oil or a sealer is still clogging the concrete’s pores, and you’ll need to do more degreasing or even consider mechanical grinding. Chris Sullivan, Vice President of Sales and Marketing at ChemSystems Inc., explains:
"Stains are 95% water, so if water beads up on the surface, chances are stain will do the same".
For moisture concerns, try the plastic sheet test. Tape a piece of 3-mil plastic to the floor and leave it for 24 hours. If condensation forms underneath, you’ve got sub-slab moisture to deal with before applying any coatings. Structural integrity is another factor to check – tap the concrete with a hammer. A hollow sound could mean there are voids or delamination beneath the surface, which cleaning alone won’t fix.
When it comes to scrubbing out stains, always opt for nylon-bristled brushes. Wire brushes can create grooves in the concrete, making it easier for future stains to settle in deeper.
How to Clean Stained Garage Floors
Surface Prep: Dry Cleaning Steps
Cleaning your garage floor properly is key to maintaining the durability of epoxy or polyaspartic coatings. Start by clearing the space – move out vehicles, tools, and anything else that’s not bolted down. Then, sweep or vacuum thoroughly, paying special attention to corners and edges where dirt tends to hide. To protect your garage walls from water splashes during wet cleaning, cover the lower three feet with drop cloths.
Removing Specific Stains: Tailored Solutions for Each Type
Once the floor is clean and dry, you can tackle specific stains with the right approach for each type:
- Oil and Grease Stains: For fresh spills, blot them up immediately. For older, set-in stains, spread an absorbent material like cat litter or sawdust over the area and leave it for 24 hours before sweeping it away. Next, mix equal parts powdered laundry detergent and water to create a paste. Apply it to the stain, let it sit for 10 minutes, scrub with a stiff nylon-bristle brush, and rinse thoroughly.
- Rust Stains: These respond well to acidic cleaners. Pour white vinegar or lemon juice directly onto the rust marks and let it sit for 10–15 minutes before scrubbing. For tougher rust stains, a commercial rust remover containing oxalic acid may be necessary.
- Paint and Adhesive Residues: Scrape off loose paint or adhesive with a putty knife. Latex paint can be removed using a mixture of trisodium phosphate (TSP) and water. For mastic or glue residue, a citrus-based cleaner works best. If you’re dealing with epoxy or oil-based paint, mechanical removal with an angle grinder and a diamond cup wheel may be required.
For a general deep clean, mix 1/3 cup of powdered laundry detergent per gallon of hot water. Scrub the floor with this solution and allow it to dry completely – at least 24 hours – before applying any sealers or coatings.
Pressure Washing: When It’s Useful and When to Avoid It
Pressure washing is perfect for large areas or stubborn grime that scrubbing alone can’t handle. It’s especially important before applying epoxy or polyaspartic coatings, as these require a clean, porous surface for proper adhesion. For concrete floors, use a pressure setting between 3,000 and 3,500 PSI and test on a small area first to avoid damage.
Before pressure washing, apply a commercial-grade degreaser and let it sit for 10–20 minutes to lift oil from the concrete’s pores. For particularly greasy areas, hot water or steam pressure washing is more effective than cold water. After rinsing, use a squeegee to remove excess water, which helps the floor dry faster.
In humid climates like Austin, proper ventilation is critical for drying. Without it, the floor could stay damp for days, creating the perfect conditions for algae or mildew. As Full Color Cleaners explains:
"In Central and South Austin, being that they are much closer to the lake and surrounded by trees makes it a good combination for algae and mildew to grow… We highly recommend to pressure wash your property at least once a year".
However, avoid pressure washing if your concrete is new, damaged, or flaking. In these cases, soft washing – using low pressure and specialized cleaning solutions – or mechanical grinding is a better way to prepare the surface.
Once the floor is clean and completely dry, you’ll be ready to move on to repairs or sealing.
Repairing and Sealing Stained Concrete
Once your concrete floor is thoroughly cleaned, it’s time to tackle any lingering damage with proper repair and sealing techniques to ensure a durable and polished finish.
Surface Preparation Methods
If cleaning alone doesn’t do the trick, diamond grinding is an effective way to remove the brittle laitance layer and reveal a porous surface. This step is crucial for ensuring that coatings adhere properly to the concrete.
Before applying any coating, it’s important to test for moisture. A simple way to do this is by taping a clear plastic sheet (18 inches square) to the floor and leaving it for at least 16 hours. If you notice condensation under the plastic or the concrete darkens, the slab has too much moisture for coating. The surface should feel slightly rough, similar to 80- to 120-grit sandpaper, to ensure proper adhesion.
For cracks, start by grinding the edges to create a clean surface. Fill the cracks with a concrete patching compound and allow adequate curing time. If you’re dealing with deep oil stains that still repel water after cleaning, additional degreasing or grinding may be necessary to achieve the right level of porosity for coating.
Using Primers to Block Stains
Even with thorough cleaning and grinding, some deep stains may still bleed through traditional coatings. To prevent this, use oil-tolerant primers. These primers create a strong bond with the concrete and act as a barrier, stopping stains from seeping through.
In areas like Austin, where moisture can be a persistent issue, moisture vapor barrier primers are a must. These specialized primers handle moisture vapor transmission rates of up to 6 lb./1,000 sq. ft./24 hours. They prevent hydrostatic pressure from forcing trapped moisture or oils to the surface, which could otherwise compromise the coating.
At Epoxy Flooring Group, we rely on industrial-grade polyurethane and epoxy primers during our quick 1–2 day installations. These primers are designed to provide long-lasting stain resistance and come with a lifetime warranty. Our expert team ensures your garage floor is ready to handle everything from spills and hot tire pickup to Austin’s fluctuating temperatures.
This comprehensive repair and sealing process lays the foundation for a flawless epoxy or polyaspartic coating, giving your garage floor both durability and aesthetic appeal.
sbb-itb-f7063d7
Epoxy and Polyaspartic Coatings for Stained Garage Floors
After thoroughly cleaning and repairing the garage floor, the next step is applying a professional-grade coating system. When concrete is properly prepped, using high-quality epoxy and polyaspartic coatings can transform even the most stubborn stains into a flawless finish. These coatings form a strong molecular bond with the surface, eliminating the peeling and lifting often seen with DIY products. By combining careful surface preparation with these advanced materials, you get a durable and visually appealing result.
Why Choose Epoxy and Polyaspartic Coatings?
At Epoxy Flooring Group, our coatings are designed to provide a tough, non-porous barrier. This means substances like oil, grease, antifreeze, road salt, and battery acid bead up on the surface instead of seeping into the concrete. Specifically engineered for Austin’s intense heat and UV exposure, our coatings resist yellowing and adapt to temperature changes. The polyaspartic topcoats are entirely UV-stable, so they won’t chalk or fade like standard epoxy.
One of the standout features is resistance to hot-tire pickup. Many lower-quality coatings can peel when subjected to the heat and pressure of vehicle tires, especially in Austin’s climate. Our polyaspartic systems are up to four times stronger than traditional epoxy and are designed to resist this type of damage. Plus, professional installations achieve about three times the adhesion strength of DIY applications, significantly reducing the likelihood of failure.
"Polyaspartic coatings are exceptionally resistant to damage, can’t be harmed by most common chemicals, road salt or UV light, and are also easy to clean." – Garage Finisher
How We Install Coatings on Stained Floors
At Epoxy Flooring Group, our installation process is designed for efficiency and precision, typically taking just 1–2 days. It starts with a moisture test, where we tape a clear plastic sheet to the floor for 24 hours to check for trapped moisture. If moisture is detected, we apply a vapor barrier primer to ensure proper adhesion. Next, we use diamond grinding to create an 80–120 grit texture, removing stains and opening the concrete’s pores for better bonding. Cracks and control joints are filled with specialized epoxy or polyurea fillers, creating a seamless base.
The next step is applying a high-bond epoxy or polyurea base coat that fuses directly with the concrete. While the base coat is still wet, decorative vinyl flakes are hand-broadcast across the surface to add texture and color. Once cured, the floor is cleaned thoroughly, and a clear polyaspartic topcoat is applied to seal and protect the system.
The floor is ready for foot traffic in 4–6 hours and vehicle use in just 24 hours. All our installations come with a lifetime warranty, offering peace of mind and performance tailored to Austin’s unique climate. This process ensures a stunning, durable transformation.
The Results: From Stained to Stunning
Stained garage floors are completely revitalized, turning into professional-grade surfaces with a clean, polished look. The decorative flake layer not only hides any remaining discoloration but also adds slip resistance and a touch of style.
Epoxy Flooring Group has transformed countless garage floors across Austin, creating durable, easy-to-maintain spaces that homeowners love. The non-porous surface makes cleaning a breeze – spills wipe up effortlessly, eliminating the need for harsh scrubbing or abrasive cleaners.
| Feature | Traditional Epoxy | Polyaspartic Coating |
|---|---|---|
| Cure Time | 5–7 days for vehicles | 24 hours for vehicles |
| UV Resistance | Prone to yellowing | 100% UV-stable |
| Flexibility | Brittle; may crack | Expands and contracts |
| Hot-Tire Pickup | Vulnerable to delamination | Resists delamination |
Thanks to expert preparation, top-tier materials, and skilled installation, these coatings deliver long-lasting results – even under Austin’s toughest conditions.
How to Maintain Your Coated Garage Floor
Once your coated garage floor is professionally installed, keeping it in top-notch condition – especially in Austin’s unique climate – doesn’t have to be complicated. Thanks to its non-porous surface, it naturally resists stains and spills, meaning you can avoid harsh chemicals or heavy scrubbing. With a few simple habits, you can protect your investment and maintain that sleek, polished look for years to come.
Daily and Weekly Cleaning Routines
For high-traffic areas, a daily sweep with a soft-bristle broom or microfiber mop will prevent dirt and debris from building up. If your garage sees lighter use, a weekly sweep should suffice. As GNU Garage explains, "Dust, sand, and debris can act like sandpaper underfoot or under your tires".
Every couple of weeks, damp mop the floor using warm water and a pH-neutral cleaner. Avoid soap-based products – they can leave a slippery, cloudy residue. For tougher messes, a diluted ammonia solution followed by a water rinse works well. Spills, especially oil, battery acid, or road salt, should be wiped up immediately with a soft cloth and mild detergent.
Steer clear of abrasive tools and harsh cleaners. Polyaspartic and epoxy coatings naturally shine without the need for wax, which can actually harm the slip-resistant texture. If you decide to use a pressure washer, keep the pressure under 1,500 PSI, use a wide fan tip, and maintain a distance of 12–18 inches from the surface.
These routine cleaning practices provide a solid foundation for tackling Austin’s specific climate challenges.
Maintenance Tips for Austin’s Climate
Austin’s scorching heat can soften tire rubber, which may leave marks on lower-quality coatings. Polyaspartic systems, like those offered by Epoxy Flooring Group, are better equipped to resist this "hot tire pickup", but regular cleaning of tire tracks is still a good idea to prevent permanent stains. After summer storms, use a hose and squeegee to rinse away mud and debris – if left to dry, these materials can scratch the coating.
If your garage doubles as a workshop or storage area, consider placing felt pads or rubber mats under heavy equipment. When moving large items, use plywood or protective mats to avoid gouging the surface. During Austin’s rare freezes, steer clear of deicing salts near the garage entrance, as they can corrode concrete and dull the coating’s finish.
By tailoring your care routine to Austin’s weather, you can significantly extend the life of your coated floor.
Why Proper Maintenance Matters
Taking care of your coated floor isn’t just about looks – it’s about performance and longevity. Neglect can lead to premature wear, costly repairs, and even the need for a full replacement. According to Collins Concrete Coatings, "With the proper cleaning and maintenance, polyaspartic floor coating can last up to twenty years".
Here’s how maintenance – or the lack thereof – can impact your floor:
| Feature | Well-Maintained Coating | Neglected Coating |
|---|---|---|
| Lifespan | Up to 20 years | May fail within 6–18 months |
| Appearance | Retains high-gloss shine and vibrant color | Becomes dull, scratched, and discolored |
| Safety | Maintains slip-resistance | Can become slippery from salt/oil buildup |
| Cleaning Ease | Simple hose and squeegee or damp mop | Requires aggressive scrubbing or professional restoration |
A few minutes of consistent care each week can preserve both the beauty and durability of your garage floor. On the flip side, neglecting maintenance can turn even the highest-quality coating into a costly headache.
Conclusion
A stained garage floor doesn’t have to be a permanent problem. The first step to finding a lasting fix is accurately identifying the type of stain. As Polycote points out, "Epoxy floor paint needs a clean and porous surface in order to bond to concrete. Without this, it is almost guaranteed that your coating is going to fail at some point". When oil has deeply seeped into the concrete, simple cleaning won’t cut it. A thorough assessment sets the stage for a transformation that can truly revitalize your garage floor.
Professional-grade coatings offer a durable, long-term solution. These systems rely on advanced surface preparation methods like diamond grinding or shot blasting. This process removes embedded stains and opens up the concrete’s pores, creating a strong mechanical bond that can last 10 to 20 years. For Austin’s challenging climate, polyaspartic topcoats are a standout choice. They provide UV stability to prevent yellowing and feature up to 300% elasticity, allowing them to withstand temperature fluctuations without cracking. When paired with meticulous installation, these systems also shield your floor from the region’s tough conditions.
Epoxy Flooring Group takes it a step further, completing installations in just 1–2 days and offering a lifetime warranty. Using 100% polyaspartic technology designed specifically for Texas’s intense heat and sunlight, their coatings form a seamless, chemical-resistant barrier. This makes future cleaning effortless, whether you’re dealing with decades-old oil stains or fresh tire marks. Their process ensures the coating bonds permanently to sound concrete, delivering results you can count on.
A professionally coated garage floor doesn’t just cover up stains – it prevents them from coming back. Combined with proper maintenance routines, your floor will keep its shine and durability for years to come. Don’t settle for quick fixes or coatings that fail over time. Opt for a solution that tackles the root of the problem and provides lasting results.
FAQs
What’s the best way to remove oil stains from a garage floor?
To tackle oil stains on your garage floor, start by soaking up any fresh oil using cat litter or sawdust – these materials work great for absorbing excess oil. Once that’s done, grab a high-quality degreasing cleaner and apply it directly to the stained area. Use a stiff nylon brush to scrub the spot thoroughly, breaking down the oil. After scrubbing, rinse the area well with water to wash away any leftover residue. For stubborn stains, you might need to repeat the process or let the cleaner sit for a few minutes before scrubbing again.
What can I do to make sure my garage floor coating holds up to Austin’s weather?
To make sure your garage floor coating can handle Austin’s challenging climate, it’s important to opt for UV-resistant, durable coatings like polyaspartic. These coatings are built to withstand the region’s intense heat, fluctuating temperatures, and high humidity. Equally crucial is proper surface preparation – this means thoroughly cleaning, repairing any damage, and priming the concrete to create a solid foundation for the coating. When you combine tough, flexible materials with professional installation, you’ll get a garage floor that lasts and holds up against the elements.
How do I properly maintain my coated garage floor?
To keep your coated garage floor looking great and lasting longer, make a habit of sweeping or vacuuming it every week to clear away dirt and debris. Every month or two, give it a deeper clean with a pH-neutral cleaner and a damp mop. If you notice any spills, clean them up immediately to avoid stains or damage. Steer clear of harsh chemicals or abrasive tools, as these can harm the coating.
For added protection, use mats or pads under heavy equipment or tools to prevent scratches. Occasionally, rinse the floor with water or a garden hose, but make sure to dry it completely to avoid moisture problems. Take time to inspect the surface regularly for any signs of wear or damage to keep the coating in good shape for years to come.