
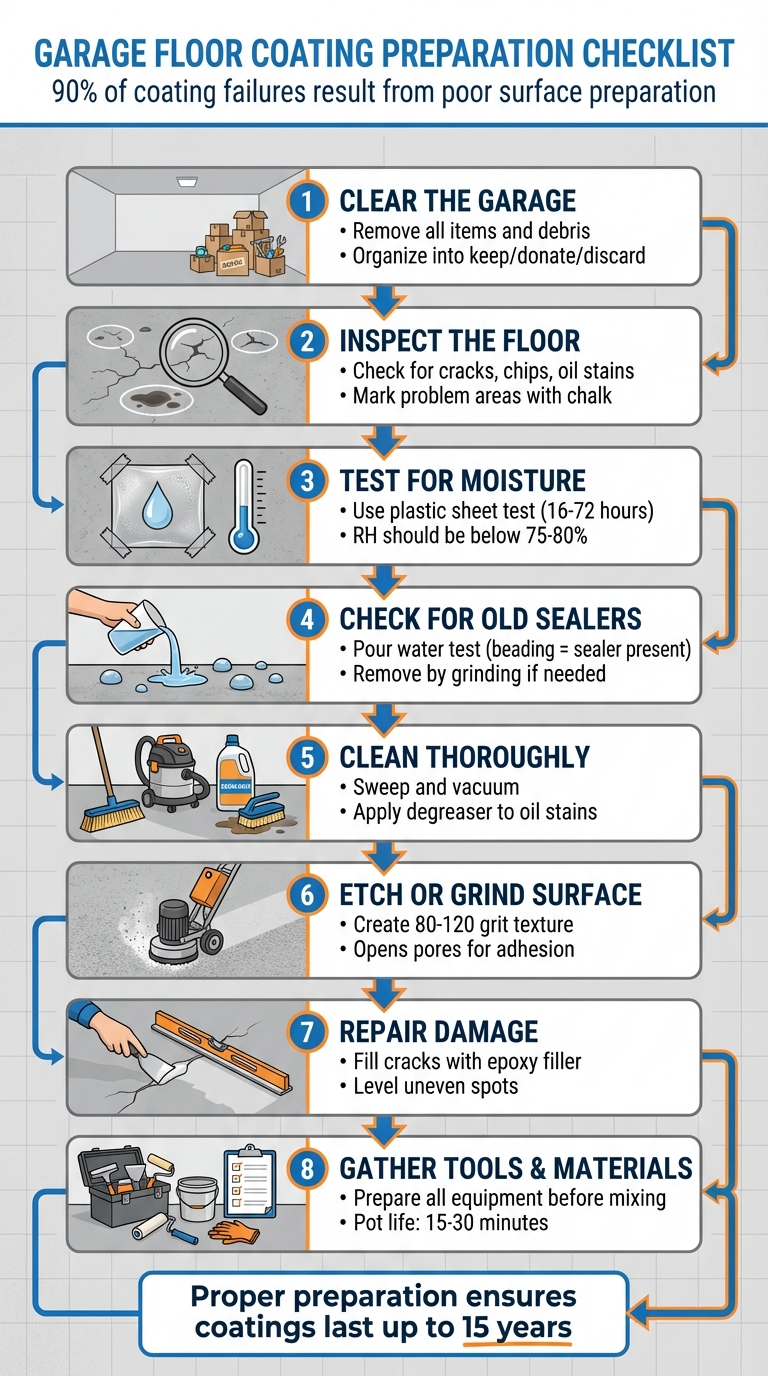
A durable garage floor coating can last up to 15 years, but 90% of coating failures result from poor surface preparation. Proper preparation ensures the coating adheres correctly and withstands wear over time. Here’s a quick summary of what you need to do:
- Clear the garage: Remove all items and clean up loose debris.
- Inspect the floor: Check for cracks, chips, oil stains, and uneven spots. Mark problem areas for repair.
- Test for moisture: Use a plastic sheet or relative humidity test to confirm the floor is dry enough for coating.
- Check for old sealers: Pour water on the surface – if it beads up, remove the sealer by grinding.
- Clean thoroughly: Sweep, vacuum, and degrease to remove dust, grease, and contaminants.
- Etch or grind the surface: Create an 80–120 grit texture for proper adhesion.
- Repair damage: Fill cracks, level uneven spots, and sand for a smooth finish.
- Gather tools and materials: Have everything ready to avoid delays during application.
Preparation is key, especially in regions like Austin, where heat and humidity can cause coating issues. Follow these steps to ensure a strong bond and a long-lasting finish.
8-Step Garage Floor Coating Preparation Checklist
Clear and Inspect Your Garage Floor
Remove Everything from the Garage
Start by clearing out your garage entirely – this includes vehicles, storage units, shelving, appliances, tools, and any other items. This step not only protects your belongings from dust and debris but also ensures the installation team has full access to the entire floor. Once the space is empty, sweep away any loose debris, dust, and cobwebs from both the concrete floor and the base of the walls.
As you clear the space, organize your items into three groups: keep, donate, or discard. This will help reduce the amount of stuff you’ll need to store temporarily. To protect the items you’re keeping, consider using portable storage units, garage tents, or heavy-duty tarps. Additionally, set up caution tape or clear signs to keep kids, pets, and delivery drivers out of the workspace during the process.
It’s a good idea to start this process a few days before installation to avoid any last-minute stress. Once the garage is empty, you’ll be ready to inspect the floor for any underlying issues.
Check for Cracks and Surface Problems
A thorough inspection of your garage floor is essential to prevent coating problems, especially in Austin’s challenging climate. Walk the entire surface and carefully check for cracks, chips, gouges, oil stains, and uneven spots. Use chalk to mark these problem areas so nothing gets overlooked during repairs.
Pay close attention to the size and depth of cracks. Cracks wider than 1/8 inch – or those where one side is higher than the other – may require a professional evaluation. Run your hand along the cracks; if you feel a height difference greater than 1/4 inch, it’s a potential trip hazard that needs immediate attention. For cracks that sound hollow when struck on either side, this could indicate voids or a loss of support beneath the slab.
Look for texture issues too. Signs like scaling (flaking or peeling of the surface), pitting (small, deep holes), and crazing (a web of fine cracks) can all signal trouble. Watch for white, powdery residue – known as efflorescence – which indicates moisture problems that could interfere with proper coating adhesion. Similarly, dark patches or damp areas suggest underlying moisture issues that must be fixed before any coating is applied.
Use a ruler to measure the width of cracks and any vertical misalignments in the surface. Document your findings along the way. Since Austin’s heat and humidity can put extra stress on concrete, catching these issues early is key to avoiding coating failures later.
Test for Moisture and Old Sealers
Run a Moisture Test
Concrete naturally absorbs water, whether from the ground or its original mix. If you apply a coating to a damp slab, the trapped moisture can lead to bubbling, blistering, peeling, and even mold growth – issues no one wants to deal with.
To check for moisture, tape a clear plastic sheet tightly to the concrete and leave it there for 16 to 72 hours. If you see condensation under the plastic or notice a darkened area on the concrete, the slab likely has too much moisture for proper coating. In regions like ours, where humidity levels can fluctuate, this step is critical. Flooring manufacturers universally recommend moisture testing to avoid adhesion problems.
For a more precise assessment, consider relative humidity (RH) testing. This method uses electronic probes inserted into small drilled holes to measure moisture levels deep within the slab. The RH should be below 75–80% to ensure the coating adheres properly. While professional moisture testing can cost upwards of $1,000, it’s a worthwhile investment to avoid expensive coating failures down the line.
Once you’ve confirmed the slab’s moisture levels are within acceptable limits, the next step is to check for old sealers that might interfere with the coating’s ability to bond.
Look for Previous Sealers
Old sealers can block the pores in concrete, preventing epoxy or polyaspartic coatings from bonding effectively. To check for sealers, pour water on several areas of the floor. If the water beads up like droplets instead of soaking in and darkening the surface, it’s a clear sign that a sealer is present and needs to be removed before applying a new coating.
Another method is the muriatic acid test. On bare concrete, the acid will fizz, but on sealed surfaces, it will bead up. You can also look for visual indicators such as a shiny, "wet look" finish, peeling areas, or a whitish, powdery residue – all of which suggest the presence of an old sealer.
"Acid etching of the surface will not remove a sealer. The only way to make a previously sealed garage floor bond with epoxy correctly is by grinding the surface." – Polycote
Coating over an existing sealer is a recipe for failure. Grinding the surface not only removes the old sealer but also creates the ideal texture (80–120 grit) needed for the new coating to adhere. Given the unique challenges posed by Austin’s climate, accurately identifying moisture and sealers is a crucial step. This ensures the new coating bonds securely to the concrete, allowing it to deliver the lifetime warranty that Epoxy Flooring Group proudly offers.
Clean and Remove Grease
Sweep and Vacuum the Floor
To ensure your garage floor coating adheres properly – especially in Austin’s tough climate – starting with a clean, grease-free surface is a must. Begin by sweeping the floor with a stiff-bristled broom, paying extra attention to corners and edges where dirt tends to gather. Once you’ve cleared away the larger debris, follow up with a vacuum to capture fine dust particles.
Before moving on to liquids and degreasers, protect the lower 3 feet of your garage walls by covering them with drop cloths. This precaution keeps your walls safe from accidental splashes or stains.
Apply Degreaser to Oil Stains
Concrete has a knack for soaking up oil, making surface cleaning alone insufficient. To tackle this, start by wetting the floor with hot water. The heat helps activate degreasers and breaks down oil bonds more effectively.
Next, apply a commercial-grade degreaser or a paste made from laundry detergent. The detergent’s granules act as a mild abrasive, helping to lift oil trapped deep within the concrete. Let the degreaser sit for 10–15 minutes, but don’t let it dry out on the surface.
"Concrete is a highly porous material. By porous, we mean that it has lots of tiny holes liquids like oil can seep into." – Garage Force
Once the degreaser has had time to work, rinse the floor thoroughly using a pressure washer to remove all traces of the cleaner and contaminants. Allow the floor to dry completely, then conduct a water bead test. Sprinkle water on the areas where stains were treated. If the water soaks into the concrete, you’re good to go. If it beads up, some oil remains, and you’ll need to repeat the degreasing process.
In Austin’s heat, skipping thorough cleaning isn’t an option. Any leftover grease can prevent proper adhesion and may void the lifetime warranty on your professionally installed coating. Once the floor passes the water bead test, you’re ready to move on to etching the surface.
How To Prep Concrete Floors for Epoxy Coating
Etch or Profile the Concrete Surface
Once the concrete is degreased, the next step is to create a textured surface that allows the coating to bond effectively. This rough texture is vital for ensuring the coating penetrates the surface pores and forms a strong, lasting bond. Etching plays a key role in opening up these pores.
"The objective is to prepare the concrete surface to allow the coating to absorb into the concrete providing a strong mechanical bond." – Garage Flooring LLC
By etching, you also remove the weak, dusty top layer of cement (known as laitance), which helps reduce the risk of peeling or early failure of the coating.
With the surface now clean and free of contaminants, you can move on to creating the ideal surface profile for coating.
Choose the Right Etching Method
For concrete that has cured for at least 30 days, acid-based etching solutions are a reliable choice. Apply the solution evenly using a pump sprayer, and scrub it into the surface with a stiff, non-metal brush. Make sure the solution stays wet while scrubbing – letting it dry can compromise the process.
If the surface has heavy contamination or an existing coating, mechanical grinding is a better option than acid etching. In areas like Austin, where many garages have pre-applied sealants, grinding often delivers better results than chemical methods alone.
After etching, the next critical step is rinsing to remove any leftover chemicals.
Rinse and Check the Surface
Rinse the floor thoroughly multiple times with a pressure washer or a high-pressure hose to clear away all chemical residues. Use a non-metal squeegee to guide the water away from any low spots on the floor.
Allow the floor to dry completely – this usually takes about three days (72 hours). To speed up the drying process, you can use fans or keep windows open for better air circulation. Before applying the coating, perform a quick porosity test: sprinkle water on different areas of the floor. If the water absorbs quickly, the surface is ready. If it beads up, more etching or cleaning is needed. Finally, run your hand over the dry surface – if you notice any white dust, vacuum or rinse the area again.
sbb-itb-f7063d7
Fix Cracks and Surface Damage
Once the etching process is complete, it’s time to tackle cracks and uneven surfaces. Properly repairing these imperfections is essential for a smooth, durable coating that lasts. Even minor flaws can become glaring issues under the finished coating, not to mention they can weaken its bond to the surface. A flawless, level floor ensures your epoxy or polyaspartic coating adheres well and looks polished.
"Epoxy crack filler is great for prepping floors before applying coatings because it creates a smooth, sandable surface." – Sarah Etler, Content Marketing Manager, A-1 Concrete Leveling
The secret lies in choosing the right materials for the job. Rigid epoxy fillers are ideal for prepping concrete because they can be sanded down to match the surrounding surface. By addressing cracks and leveling out inconsistencies, you’ll set the stage for a professional-grade finish.
Fill Cracks with Epoxy Filler
Start by thoroughly cleaning each crack. Use a wire brush and vacuum to remove debris. If there’s any oil or grease near the crack, scrub the area with a degreaser to ensure the filler bonds properly.
For hairline to medium cracks (up to 1/2 inch wide), a two-part epoxy crack filler applied with a caulking gun works best. For deeper cracks (over 1/2 inch), insert foam backer rods into the void before applying the filler. This prevents wasting material and helps the epoxy cure evenly.
For wider or deeper repairs, mix epoxy resin with fine silica sand to create an epoxy mortar. The amount of aggregate you’ll need depends on the depth of the repair: for cracks 1/8 inch deep, use 1/2 to 3/4 lbs. of aggregate per square foot; for 1/4 inch deep repairs, increase to 1 to 1.5 lbs. per square foot. Pack the mixture into the crack using a putty knife or margin trowel, slightly overfilling it. Once cured, scrape it flush with a razor blade for a seamless finish.
These steps ensure a smooth, even surface that’s ready for coating. After filling the cracks, assess the floor for any remaining irregularities.
Level Uneven Spots
To identify low spots or pits, mark areas with a depth of 1/4 inch or more. For high spots or ridges, grind them down first using an angle grinder with a coarse wheel.
For deep voids, use a concrete resurfacer. Mix it to a stiff texture and trowel it flush with the surrounding surface. If you’re dealing with moderate dips across larger areas, self-leveling compounds are a better choice. Mix the compound to a pancake batter-like consistency and spread it quickly with a squeegee, as it sets fast. Before applying the resurfacer, dampen the concrete to prevent the dry slab from pulling moisture out of the mix too quickly.
Once the resurfacer has dried, sand any rough patches with an orbital sander and 60-grit sandpaper. This final sanding step ensures a uniform surface, perfectly prepped for the cleaning and coating stages.
Collect Your Tools and Materials
Before diving into the project, gather all your tools and materials ahead of time to keep things running smoothly. Epoxy and polyaspartic coatings tend to harden quickly – usually within 15–30 minutes. Once you mix the resin and hardener, the clock starts ticking, so there’s no time to waste. If you’re scrambling for a roller or a mixing paddle, you might find the coating hardening in the bucket before you even start spreading it.
Make sure you have enough materials and that all your tools are clean and ready to go. These coatings should only be applied to concrete that has cured for at least 28 days at 70°F, with a moisture vapor emission rate under 3.0 lbs per 1,000 sq ft/24 hrs. Having an extra set of hands is a smart move – one person can pour and roll the coating while the other broadcasts decorative flakes, ensuring you maintain a wet edge. Being prepared with the right tools will make the application process much smoother.
Required Tools
Here’s what you’ll need to get started:
- Preparation tools: A 4" or 7" grinder with cup wheels for profiling, a floor scraper, and a HEPA-filter vacuum to manage dust. For mixing, you’ll need a variable-speed power drill with a Jiffy-style or hex head paddle, 5-gallon pails, and graduated measuring containers (1 to 5 quarts) for precise resin ratios. Stick to matching pails to avoid contamination from plastic shavings.
- Application tools: 9" and 18" roller cages with extension poles, shed-free roller covers (1/4" or 3/8" nap), squeegees for spreading, and brushes for detailing edges. Avoid mohair pads – they can act like squeegees and scrape the floor instead of spreading the resin evenly. Spiked shoes are a must for walking on wet coatings to broadcast flakes or back-roll without leaving marks. Safety gear is just as important: chemical-resistant nitrile gloves, safety goggles, carbon-filter respirators for fumes, and knee pads for comfort during floor prep.
"Investing in a good wet-dry vacuum is a sensible option here so it can be used for other tasks, such as the collection and disposal of degreasing solutions." – Jack Josephsen, Expert
Set up a mixing station using heavy-duty plastic tarps or cardboard to catch any spills and protect your driveway or garage floor. Keep cleaning solvents like Xylene, Isopropyl Alcohol, or Denatured Alcohol nearby to clean your roller frames and mixing tools between batches. Epoxy cures hard, so leaving it to dry on your equipment could ruin it.
Coating Materials
A standard coating system includes several key components: a concrete primer, the base resin (Part A), a polymer hardener (Part B), decorative flakes or metallic pigments, and a protective topcoat – usually urethane or polyaspartic. Always double-check whether the mix ratio is based on weight or volume; using the wrong measurement can stop the epoxy from curing properly. Most epoxy formulas have a short pot life, so you’ll need to apply them within about two hours of mixing.
If you’re repairing cracks or holes, keep epoxy-compatible polyurea, cementitious, or quartz-based patches on hand. For added safety, include slip-resistant additives in the topcoat, especially in humid conditions. Once mixed, spread the epoxy in ribbons across the surface – leaving it in the bucket will cause it to harden faster due to the heat generated during the exothermic reaction.
Confirm Dryness and Do a Final Clean
Verify the Floor is Dry
Once you’ve finished cleaning, etching, and repairing, it’s crucial to ensure the floor is completely dry before applying any coatings. Trapped moisture under epoxy or polyaspartic coatings can lead to bubbling, peeling, or cloudy spots that ruin the finish. To confirm dryness, you can use a plastic sheet test or a calcium chloride test.
For the plastic sheet test, tape an 18×18-inch clear plastic sheet to the floor and leave it for 16–24 hours. If you notice condensation on the underside or the concrete appears darker, there’s still moisture present. For a more precise measurement, perform a calcium chloride test to ensure the moisture vapor emission rate is below 3 lbs per 1,000 sq. ft. over 24 hours.
"Moisture isn’t always visible – but it’s always a risk. Whether you’re working in Arizona, the Southeast, or up north, concrete can hold surprising levels of trapped vapor." – Roy Magnuson, Owner, Allsource Supply Inc.
To speed up drying, use high-volume fans, open windows, or employ blowers. Be cautious not to conduct moisture tests in direct sunlight, as heat can distort the results. Once you’re confident the floor is dry, you’re ready for the final cleaning step to ensure proper coating adhesion.
Remove Final Dust and Debris
After confirming the floor is dry, it’s time for a thorough final cleaning to eliminate any lingering dust or debris. Residual particles can weaken the bond of the coating and create an uneven finish. Use a shop vacuum equipped with a HEPA filter to capture fine concrete dust effectively, as standard vacuums may blow particles back into the air.
For stubborn dust, a sweeping compound like Zep can help. It binds to fine particles, preventing them from becoming airborne during sweeping. After sweeping, follow up with a microfiber mop for a final wipe-down. Microfiber mops are preferable to traditional string mops because they pick up fine residue without leaving lint behind. Pay close attention to corners and edges, as these areas tend to accumulate dust.
To confirm the surface is clean, perform a water bead test. If water soaks in immediately, the floor is ready for coating. If it beads up, there’s still oil or contamination that needs to be addressed.
Conclusion
Getting your garage floor ready the right way is the key to a durable, long-lasting coating. Proper surface preparation ensures the coating bonds effectively with the concrete, delivering reliable performance over time. Skipping crucial steps like moisture testing, degreasing, or profiling the surface can lead to peeling, bubbling, or early failure.
Taking the time to clean, dry, and properly texture the concrete creates the perfect surface for epoxy or polyaspartic coatings to adhere. This preparation is especially important in Austin, where heat, humidity, and heavy use put garage floors to the test. A little effort upfront can save you from costly repairs down the road.
"Following the proper prep procedures will dramatically affect the look and longevity of your finished project." – BEHR
While this guide gives you the tools to prepare your garage floor, professional installation offers additional benefits. Epoxy Flooring Group uses advanced techniques and professional-grade equipment to ensure your coating adheres flawlessly. Their UV-stable polyaspartic systems are specifically designed for Central Texas conditions, and with a lifetime warranty, you can count on a floor that lasts over 15 years without the risks of DIY errors.
Ready to take the next step? Let Epoxy Flooring Group transform your garage with expert preparation and high-performance coatings. Contact them today for a custom quote and see the difference professional craftsmanship makes.
FAQs
How can I check for moisture in my garage floor before applying a coating?
To check for moisture in a concrete slab, take a clear plastic sheet, roughly 18×18 inches, and securely tape it to the bare concrete using duct tape. Make sure all edges are tightly sealed. Leave it undisturbed for 24 hours. If you find condensation on the underside of the plastic or notice the concrete darkening, moisture is present. This step is essential because addressing moisture is key to ensuring the coating bonds properly and remains durable.
How should I prepare my garage floor if it has old sealers?
If your garage floor has existing sealers, you’ll need to remove them completely before applying a new coating. The best way to do this is through mechanical methods, like grinding or shot blasting. These techniques clean the surface thoroughly and prepare it for the new coating to adhere properly.
Avoid using chemical removers – they can be messy and might leave behind residue that can interfere with the coating process.
Properly stripping the old sealers is crucial to ensure your epoxy or polyaspartic coating bonds well, resulting in a smooth, durable finish that stands the test of time.
Why should cracks be repaired before installing a garage floor coating?
Before applying a garage floor coating, it’s essential to repair any cracks in the concrete. This ensures a smooth, even surface that allows the coating to properly adhere. Skipping this step can result in poor bonding, uneven wear, and a less polished finish, ultimately affecting the durability and look of your garage floor.
Taking the time to fix cracks creates a solid base for the coating. This not only helps it endure heavy use and temperature fluctuations but also ensures it can handle the unique climate conditions in Austin. It’s a vital step for achieving a durable, high-quality finish that stands the test of time.