
Proper preparation is the most important step for durable epoxy floors. Skipping it can lead to peeling, bubbling, or poor adhesion. Here’s a quick summary of the process:
- Inspect the Concrete: Look for cracks, stains, and moisture. Repair damage and ensure the surface is clean.
- Clean Thoroughly: Sweep, vacuum, degrease, and rinse. Remove all contaminants like oil and grease.
- Repair and Level: Fill cracks with epoxy compounds and sand repaired areas until smooth.
- Profile the Surface: Use diamond grinding or acid etching to create a rough texture (CSP 3–5) for better adhesion.
- Test for Moisture: Ensure the concrete is dry using plastic sheet or RH tests. Moisture can ruin the bond.
- Final Cleaning: Remove all dust and debris with HEPA vacuums. Perform a tape test to confirm cleanliness.
These steps ensure the epoxy bonds securely, creating a floor that lasts for years. If you’re unsure, professional help can save time and avoid costly mistakes.
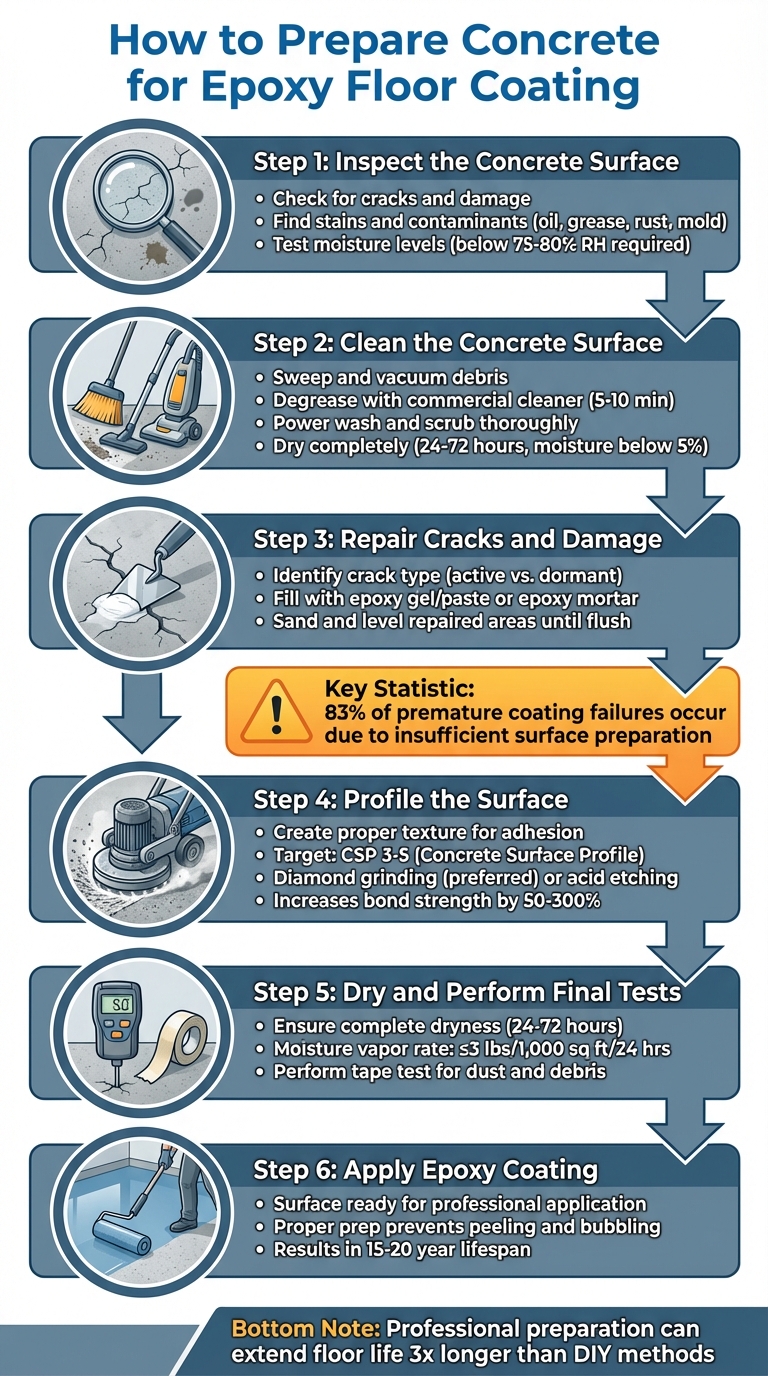
6-Step Concrete Preparation Process for Epoxy Floor Coating
How To Prep Concrete Floors for Epoxy Coating
Step 1: Inspect Your Concrete Surface
Before diving into cleaning or repairs, take a close look at your concrete surface. This step helps you spot potential problems – like cracks, stains, moisture issues, or uneven areas – that could interfere with your epoxy coating. A careful inspection now sets the stage for smooth preparation and a durable epoxy finish.
Look for Cracks and Damage
Start by sweeping or vacuuming the floor to uncover any small imperfections. Keep an eye out for cracks (linear breaks in the surface) and spalling (flaky or crumbling areas). These weak spots can prevent the epoxy from bonding properly.
Next, use a straightedge or level to check for uneven areas. High spots might result in thin, worn-down sections of the coating, while low spots can cause puddling and uneven thickness. Also, look for loose debris like flaking paint, scale, or crumbled masonry. Any damaged or unstable areas should be repaired or replaced before applying the epoxy.
Find Stains and Contaminants
Stains and contaminants often leave visible traces. Oil and grease show up as dark spots, rust appears orange-brown, mold can look dark green or black, and efflorescence – a chalky white residue – indicates moisture pulling salts to the surface.
Some contaminants, like petroleum-based residues, might not be obvious on dry concrete but can still cause the epoxy to fail. To detect hidden issues, pour small amounts of water on different areas of the floor. If the water beads up instead of soaking in, it’s a sign that something – like a sealer, oil, or another contaminant – is blocking the pores. As ConcreteCamouflage.com explains:
Looking at concrete under a microscope you see that it looks like a sponge
If these sponge-like pores are clogged, the epoxy won’t be able to form the strong mechanical bond it needs.
Test for Moisture Levels
Moisture is one of the main reasons epoxy coatings fail, leading to peeling, bubbling, or delamination. A simple way to test for moisture is to tape a 2′ x 2′ square of clear plastic (like a heavy garbage bag) to the floor, sealing the edges with duct tape. After 24–48 hours, check for condensation on the plastic or a dark spot on the concrete.
High-quality epoxy coatings require a moisture vapor emission rate (MVER) of 3–5 lbs per 1,000 sq ft over 24 hours. For more precise results, professionals use in-situ relative humidity (RH) probes, which measure moisture levels inside the concrete by drilling into the slab. Typically, readings should be below 75–80% RH for safe epoxy application. In areas like Austin, where temperature and humidity can vary widely, it’s a good idea to test during wetter seasons to get an accurate sense of year-round conditions.
Step 2: Clean the Concrete Surface
Cleaning the concrete surface is about more than just making it look good – it’s a critical step to ensure the epoxy bonds properly. Dirt, oil, and other contaminants can interfere with adhesion, so a thorough cleaning process is key. This involves removing debris, degreasing, scrubbing, rinsing, and ensuring the surface is completely dry. Taking the time to clean properly sets the stage for effective repairs and better surface preparation later on.
Sweep and Vacuum
Start by sweeping the surface with a stiff-bristled broom to get rid of dirt, sand, and loose debris. Follow this up with a shop vacuum to remove finer particles. For the best results, consider using a vacuum designed specifically for concrete, as standard vacuums may not capture microscopic dust. Once the surface is free of debris, you can move on to tackling ingrained contaminants with a degreaser.
Degrease and Power Wash
Apply a concrete degreaser, diluted as directed by the manufacturer, and let it sit for 5–10 minutes to break down oils. You can use either a trusted commercial degreaser or a simple ammonia solution for this step. For tougher grease stains, tri-sodium phosphate (TSP) or a high-alkaline degreaser combined with steam cleaning can do the trick.
After applying the degreaser, scrub the surface thoroughly with a stiff-bristled brush or a rotary power scrubber to work the cleaner into the concrete’s pores. In more demanding environments, industrial tools like scrubber-driers – machines that scrub and vacuum simultaneously – can provide a deeper clean. Keep in mind that concrete is porous, so oils and contaminants deeply embedded in the surface may resurface later.
Rinse and Dry Completely
Rinse the surface thoroughly to remove any cleaning residue, and immediately clear away standing water using a squeegee or wet vacuum. This step is essential to prevent residue buildup.
Allow the surface to dry completely, which can take anywhere from 24 to 72 hours. Most epoxy manufacturers recommend that the concrete’s moisture content be below 5% before applying the coating. To speed up the drying process, especially in humid areas like Austin, use fans and dehumidifiers. However, avoid using fuel-powered heaters like propane or kerosene models. As Jeff Raglani of CIM Industries warns:
"One of the biggest mistakes contractors make is using fuel-powered heat (e.g., propane, diesel or kerosene). These methods of heating actually can add moisture to the surrounding environment."
To ensure the surface is dry enough for epoxy, perform the Plastic Sheet Test. Tape an 18" x 18" clear plastic sheet to the concrete and leave it for 16 to 24 hours. If you notice condensation or the concrete appears darker, the surface is still too wet for the epoxy coating.
Step 3: Repair Cracks and Damage
After your concrete is clean and completely dry, the next step is to tackle any cracks or damage. Even small imperfections can weaken the bond of the epoxy, so creating a smooth and stable surface is essential. Take the time to make targeted repairs to ensure the epoxy adheres properly.
Identify the Type of Crack
Different cracks require different solutions. Active cracks – those that expand or contract over time – need flexible repair materials. Meanwhile, dormant cracks can be filled with rigid compounds for stability. If a crack is large enough to fit a quarter, it could indicate structural issues, and it’s best to consult with professionals like Epoxy Flooring Group. Similarly, cracks wider than 0.5 inches or areas with spalling (flaking or crumbling concrete) should also be assessed by experts.
Fill Cracks with a Patching Compound
For smaller cracks, use an epoxy gel or paste. Apply it with a trowel held at a 45-degree angle, smoothing the material so it’s flush with the surface. If the damage is deeper, mix sand with epoxy to add strength, and apply it in thin layers, allowing each layer to cure before adding the next.
For more serious damage, epoxy mortar is often the best choice. It sets quickly, forms a strong bond with the concrete, and in many cases, allows the epoxy coating to be applied the same day. Don’t worry if the patched areas look mismatched during this stage – they’ll be completely covered by the final epoxy layer.
Sand and Level the Repaired Areas
Once your repairs have cured, it’s time to refine the surface. Sand or grind the repaired spots until they’re perfectly level with the surrounding concrete. This step is crucial because epoxy coatings tend to emphasize any unevenness. For smaller areas, use a hand grinder or orbital sander, working in circular motions to blend the patched sections seamlessly. After sanding, vacuum up all dust to leave a clean surface ready for the next step in the preparation process. Dust-free floors are key to achieving a flawless epoxy finish.
sbb-itb-f7063d7
Step 4: Profile the Surface for Better Adhesion
Now that your concrete is repaired and clean, it’s time to prepare the surface for epoxy application by creating the right texture. This step, called profiling, is critical for ensuring the epoxy adheres properly. Think of it like Velcro – epoxy needs those microscopic peaks and valleys to grip the concrete securely.
The International Concrete Repair Institute (ICRI) uses a scale called the Concrete Surface Profile (CSP) to measure surface roughness. The scale runs from 1 to 10, with lower numbers indicating smoother surfaces and higher numbers representing rougher textures. For most residential and commercial epoxy projects, a CSP 3–5 is ideal. Why does this matter? Because 83% of premature coating failures happen due to insufficient surface roughness.
"The foundation for the success of floor coatings depends on whether the concrete has the proper concrete surface profile (CSP) or surface roughness to allow the coatings to properly adhere/bond to it." – Mike Mincemoyer, President, Stronghold Floors
Profiling doesn’t just help with adhesion – it can increase bond strength by 50% to 300%. Coatings with a bond strength above 900 psi can last 15–20 years, while those below 500 psi often fail within two years. For example, a Midwest distribution center saved $78,000 in maintenance costs by achieving a bond strength of 1,100 psi, cutting annual repair costs from $9.50 per square foot to just $1.20.
Diamond Grinding vs. Acid Etching
There are two main methods to profile concrete: diamond grinding and acid etching. Each has its pros and cons, but they serve different needs.
Diamond grinding uses rotating discs with coarse abrasives (16–25 grit) to mechanically remove the top layer of concrete. This method achieves a CSP 2, making it ideal for residential garages and light commercial spaces. It excels at removing old sealers, leveling uneven surfaces, and avoiding microcracking or hazardous chemicals.
Acid etching, on the other hand, uses muriatic acid to chemically dissolve the surface layer, creating a CSP 1 that feels like fine sandpaper. It’s more budget-friendly and works for DIY projects but has limitations. Acid etching can’t remove existing coatings, deep stains, or sealers, and it produces harmful fumes and chemical waste that require careful disposal.
| Feature | Diamond Grinding | Acid Etching |
|---|---|---|
| Method | Mechanical abrasion | Chemical reaction |
| Surface Profile | CSP 2+ (consistent) | CSP 1 (minimal) |
| Removes Contaminants | Yes (e.g., sealers, stains) | No (bare concrete only) |
| Levels Surface | Yes | No |
| Environmental Impact | Dust only (manageable) | Chemical sludge, high water usage |
| Drying Time | Immediate | 24 hours to 14 days |
For homeowners in Austin, diamond grinding is the better option. It effectively handles oil stains, removes old sealers, and creates a uniform texture essential for high-performance coatings like polyaspartic. At Epoxy Flooring Group, we rely on professional-grade diamond grinders to meet exact CSP standards, ensuring long-lasting results.
"Diamond grinding has emerged as the gold standard for preparing concrete surfaces due to its unparalleled effectiveness and numerous advantages over traditional methods like acid etching." – Tanner Runyan, Poly Tech Flooring
Regardless of the method you choose, thorough cleanup after profiling is key to a successful epoxy application.
Neutralize and Clean After Profiling
If you opted for acid etching, neutralizing the surface is non-negotiable. Residual acid can cause the epoxy to fail. Use a solution of diluted ammonia or baking soda with water to neutralize the acid, then rinse thoroughly. Keep in mind, the floor must be completely dry before proceeding, which could take 7 to 14 days depending on humidity.
For diamond grinding, cleanup is simpler but just as essential. Use an industrial HEPA vacuum to remove all dust, as even fine particles can interfere with epoxy bonding. A quick test: rub your finger on the surface. If you see white dust, the floor isn’t ready yet.
Check the concrete’s pH – it should fall between 11 and 13. If it’s below 10, additional rinsing or decontamination might be needed. Also, make sure the substrate temperature is at least 5°F above the dew point to avoid moisture issues during application.
At Epoxy Flooring Group, we use ICRI molded rubber comparator chips to confirm the surface profile matches project requirements. This meticulous attention to detail allows us to provide a lifetime warranty on our installations.
With profiling and cleanup complete, you’re ready to move on to the final drying and testing stage.
Step 5: Dry the Surface and Perform Final Tests
Once you’ve profiled the concrete and cleared away the dust, the next critical step is verifying that the surface is completely dry. Even a small amount of trapped moisture can lead to bubbling, peeling, or delamination of the epoxy. Moisture vapor transmission is actually one of the most common issues in resinous flooring installations. Before applying any epoxy, it’s crucial to ensure the concrete is dry enough to create a reliable bond. This step acts as the final checkpoint between preparation and application.
Ensure Complete Dryness
After cleaning, repairing, and profiling the surface, confirming that it’s fully dry is key to achieving proper adhesion. Concrete might look dry on the surface but could still hold moisture beneath. Depending on the temperature and humidity, drying could take anywhere from 24 to 72 hours after cleaning or profiling. In particularly humid areas like Austin, this process might take even longer, especially during the summer months.
To check for hidden moisture, use the ASTM D4263 plastic sheet test. Place a plastic sheet on the surface for 24 hours – if you notice condensation or dark spots underneath, the floor needs more drying time. For more precise results, professionals often rely on calcium chloride tests (ASTM F1869) or relative humidity probes (ASTM F2170). For epoxy to bond successfully, the moisture vapor transmission rate should not exceed 3 pounds per 1,000 square feet over 24 hours, and the slab’s relative humidity should stay below 80%.
"Coating system bond failures on slabs on grade and elevated/lightweight concrete caused by moisture vapor transmission are the industry’s largest single problem." – Epoxy.com
If you’re working in an enclosed space, you can speed up the drying process by using fans to improve air circulation or heat lamps to warm the surface. Just be cautious – ensure the substrate temperature is at least 5°F above the dew point to prevent condensation from forming.
Perform a Tape Test
Once you’ve confirmed the moisture levels are within acceptable limits, the next step is performing a tape test to check for cleanliness. This test doesn’t measure moisture – it ensures the surface is free of dust and debris. Press a piece of high-tack tape firmly onto the concrete, then peel it off. If you find white dust, particles, or debris sticking to the tape, the floor needs another round of vacuuming. Even tiny amounts of dust can interfere with the epoxy’s ability to bond by preventing it from locking into the concrete pores.
At Epoxy Flooring Group, we take this step seriously. We use industrial HEPA vacuums and conduct multiple tape tests across the entire surface before applying any coating. This attention to detail allows us to confidently offer a lifetime warranty on our installations. For homeowners in Austin, this step is particularly important, as dust can settle quickly in the area’s humid climate. Be sure to perform the tape test immediately before applying the epoxy.
With the surface thoroughly dried and cleaned, you’re ready for a smooth and durable epoxy application. If any part of this process feels overwhelming, it might be worth considering professional help to ensure the best results.
Why Choose Epoxy Flooring Group for Concrete Preparation in Austin, TX
When it comes to epoxy flooring, the secret to a durable and long-lasting finish lies in proper concrete preparation. At Epoxy Flooring Group, we don’t cut corners. We rely on industrial diamond grinders to create the perfect "open-pore" surface that ensures maximum adhesion. This process also eliminates stubborn oil, grease, and deep contaminants that DIY methods simply can’t reach.
Austin’s harsh sun and high UV exposure can wreak havoc on standard coatings, causing them to yellow or peel over time. That’s why we use UV-stable polyaspartic topcoats, designed specifically to handle Texas weather. These advanced coatings stand up to the heat, the sun, and even frequent rain, making them a smart choice for Austin homeowners. It’s this level of preparation and attention to detail that sets professional installations apart from DIY attempts.
DIY Risks vs. Professional Preparation
When comparing DIY efforts to professional methods, the difference is night and day. The quality of your concrete preparation directly impacts whether your epoxy floor lasts or fails within the first year.
| Feature | DIY Preparation Risks | Epoxy Flooring Group Benefits |
|---|---|---|
| Surface Profiling | Relies on acid etching, which often results in uneven depth and texture | Industrial diamond grinding ensures a precise Concrete Surface Profile (CSP-3) for optimal adhesion |
| Moisture Management | Skips moisture testing, leading to bubbling or "fish eyes" | Comprehensive moisture testing guarantees a completely dry slab |
| Equipment | Limited to basic tools that leave dust behind | Professional-grade grinders with HEPA filtration for a dust-free workspace |
| Timeline | Takes 5+ days including prep and curing | Most installations completed in just 1–2 days |
| Durability | Prone to peeling or flaking within a year | Professionally installed floors last over 15 years |
| Climate Protection | Standard coatings may degrade under Austin’s intense sun | UV-stable coatings built to withstand Texas weather |
Lifetime Warranty and Expert Installation
Our professional approach doesn’t just stop at preparation. We back our work with a lifetime warranty against peeling and chipping, far surpassing what any DIY kit can offer. Most residential projects are completed in 1–2 days, and your new floor is ready for vehicles within 48–72 hours. Using 100% solids epoxy, our process ensures rapid hardening and curing, cutting down project time significantly compared to traditional methods.
The cost for professional installation typically ranges between $3 and $12 per square foot, with most Austin-area homes averaging around $4.95 per square foot. While this is an investment, it eliminates the expensive risks of DIY failures. Our combination of diamond grinding and chemical etching creates a strong, lasting bond that prevents peeling – something no rental equipment or store-bought product can match.
Conclusion
Proper preparation is the backbone of a durable and long-lasting epoxy floor. As we’ve detailed, every step – from inspection to profiling – plays a crucial role in ensuring the longevity and resilience of your flooring. Did you know that over 70% of coating failures stem from overlooked issues in the concrete substrate? Even more striking, nearly 90% of epoxy floors installed on inadequately prepared surfaces show cracks or peeling within two years.
Professional preparation makes all the difference. By opening up the concrete’s pores, it allows for a strong mechanical bond that elevates your floor beyond the typical DIY outcomes. It addresses weak laitance layers and other common problems that can undermine adhesion. These meticulous steps, covered earlier, are the key to achieving a high-performing epoxy floor.
"The secret to enduring epoxy floors lies beneath the surface. Proper groundwork transforms ordinary slabs into resilient foundations." – Chris Lavin, Author and Industry Expert
At Epoxy Flooring Group, we take preparation seriously and never cut corners. From industrial diamond grinding to thorough moisture testing, we use advanced techniques and materials, including UV-stable polyaspartic topcoats, to tackle Austin’s challenging climate. This attention to detail can extend the life of your floor coating up to three times longer than average. Plus, every installation is backed by our lifetime warranty against peeling and chipping.
Ready to upgrade your concrete with a durable epoxy finish? Contact Epoxy Flooring Group for a free estimate. With our expertise, we ensure every inspection, cleaning, repair, and profiling step results in a flawless finish. Most residential projects are completed in just 1–2 days. Let us help you achieve a floor that stands the test of time.
FAQs
How can I check my concrete for moisture before applying epoxy?
To check the moisture levels in your concrete, you can use the ASTM F2170 in-situ relative humidity method. This process requires drilling holes into the slab – down to 40% of its thickness – placing specialized probes inside, and waiting 24 hours to get a reading. For epoxy to bond properly and last, the relative humidity (RH) should be under 75%.
Proper moisture testing is essential for ensuring the durability of an epoxy floor, particularly in Austin’s humid conditions. If you’re not confident in handling this yourself, it’s a good idea to reach out to a professional to avoid any complications.
What happens if you don’t properly prepare the concrete surface before applying epoxy?
Failing to get the concrete surface ready the right way can lead to a host of problems that mess with both the durability and the look of your epoxy floor. Issues like peeling, blistering, cracking, and delamination are common when the surface isn’t prepped properly. These problems don’t just make the floor look bad – they also weaken the coating’s grip on the surface, cutting the floor’s lifespan short and potentially leading to expensive fixes or even redoing the whole thing.
To avoid this, it’s crucial to take the time for proper surface preparation. This means thoroughly cleaning the surface, repairing any cracks, and profiling the concrete so the epoxy adheres as it should. These steps are especially important in Austin, where temperature swings and high humidity can make adhesion problems even worse. Skipping preparation might save time upfront, but it’s a shortcut that often leads to premature failure.
Can I prepare my concrete with acid etching instead of diamond grinding?
Yes, acid etching can be used as an alternative to diamond grinding for prepping concrete surfaces, but it’s not always the ideal choice. While it does create a rough texture that helps epoxy stick, it might not remove all contaminants or deliver the same level of uniformity as diamond grinding. To ensure the best outcome – especially with the challenges posed by Austin’s distinct climate – it’s a good idea to consult with professionals to decide on the right preparation method for your project. Additionally, thorough cleaning and addressing cracks are essential steps to achieve a durable and long-lasting epoxy floor.